Starting from just $35, Raspberry Pi is one of the cheapest computers that one can own, and the craziness doesn’t end at its price tag. From building structurally complex IoT projects to deploying remote servers or using it as your everyday desktop computer, there’s a lot that you can do on a Raspberry Pi.
If you’re a beginner programmer, these complex projects might be overwhelming to you. Hence, if you just bought a Raspberry Pi and don’t know how to get started, in this article, we’ll tell you the first thing people do after buying a Pi: how to do a Raspberry Pi headless setup. Using this method, you can SSH remotely from anywhere to access your Pi’s content. So, without any further adieu, let’s begin.

Raspberry Pi Headless Setup
Prerequisites:
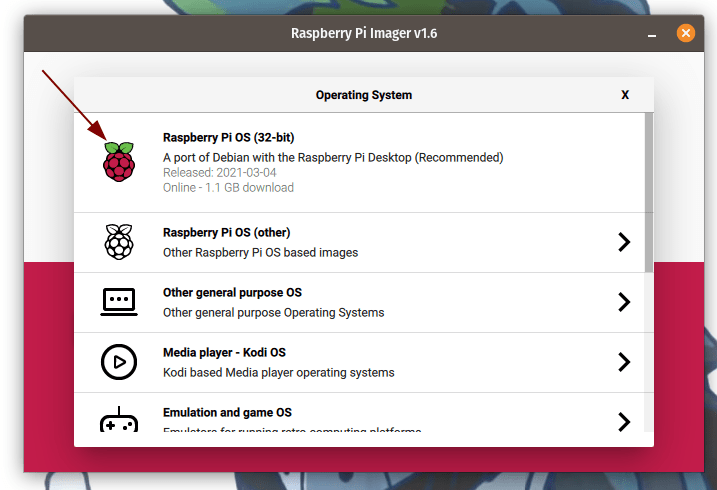
Install Raspbian/Raspberry Pi OS On SD card
Also read, Raspberry Pi Imager V1.6 Released: What’s New?
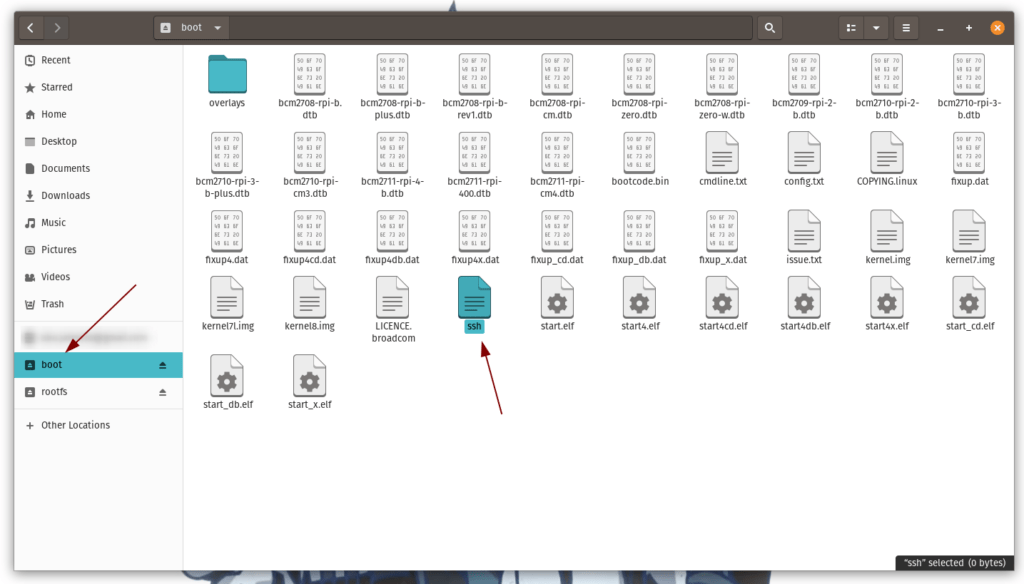
Add SSH And Wpa_Supplicant.conf Files In The Boot Partition
We’re going to access Raspberry Pi using SSH. SSH stands for the secure shell that, for starters, enables users to control devices over the air.
The imager tool creates two partitions, among which one will be thebootpartition. Use the file manager on Linux/Windows to open up this partition.

If you want to connect via ethernet, just plug-in the ethernet cable and follow the rest of the steps given below.
Now, remove the SD card from your PC and insert it into the Pi.
Also read,How to Install And Setup Raspbian/Raspberry Pi OS Using NOOBS For The First Time
Raspberry Pi Headless Seup: Accessing Raspberry Pi Via SSH
All that’s remaining is to connect to Pi via SSH. After starting the Pi, give it two to five minutes to boot up.
Download PuTTY and install it (Links are given in the prerequisites sections). To install it on Linux, type the following command and hit enter.

Do you want to learn more about Raspberry? Check out our in-depthRaspberry Pi guidehere!
Install VNC Viewer And Remotely Control Raspberry Pi
Download and install the VNC viewer from the links provided in the prerequisites section.
Start the connection by double-clicking on the VNC instance you just created and you should see the Raspberry Pi desktop now.
Do you see “Unable to access desktop?” It’s because of the default resolution of your computer or monitor. To fix this:
Welcome to the Raspberry Pi Desktop!
Did you found this way too complicated to understand? Do ensure to check outhow to install and setup Raspbian/Raspberry Pi OS using NOOBS for the first time.
Want to install Android instead? Read ourhow to install Android on Raspberry Piarticle to convert your personal computer to an Android device and run amazing Android apps.
That’s pretty much it in this guide. Let us know in the comments section below if it helped you in the headless setup of Raspberry Pi. Got questions or having problems following the article? Drop them in the comments section below.
